CSSを使って、画像表示をコントロールできます。あらかじめ小さな画像を1枚の大きな画像にまとめておいて、表示をするときに必要な部分だけ見せるという方法をCSS Spriteと呼びます。これについて理解しましょう。
まず、下記のような画像をsample.pngという名前で用意します。32px x 32px の画像を2行3列でまとめたものです。

これを次のように32px x 32px のブロックを切り出して縦に表示するようにします。左側の線はブラウザの境界線です。
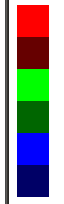
CSSを含むHTMLのコードは次のようになります。red, red66 といったクラスを用意して表示をコントロールしています。
<!DOCTYPE html>
<html>
<head>
  <meta http-equiv="content-type" content="text/html; charset=UTF-8">
  <title>Queue</title>
  <style type="text/css">
  .icons {
    background-image: url("./sample.png");
    background-repeat: no-repeat;
    width: 32px;
    height: 32px;
  }
  .red { background-position: 0px 0px; }
  .red66 { background-position: 0px -32px; }
  .green { background-position: -32px 0px; }
  .green66 { background-position: -32px -32px; }
  .blue { background-position: -64px 0px; }
  .blue66 { background-position: -64px -32px; }
  </style>
</head>
<body>
  <div class="icons red"></div>
  <div class="icons red66"></div>
  <div class="icons green"></div>
  <div class="icons green66"></div>
  <div class="icons blue"></div>
  <div class="icons blue66"></div>
</body>
</html>